Part 2. Building Home Weather Station with .NET 6 and Raspberry Pi 4. Taking Measurements
I was looking for a fun project to do this holiday season and decided that it’s about time to put my Raspberry Pi to good use. The idea is to build a device that will measure temperature, humidity, and barometric pressure in an apartment. Then, send this data to Azure and have an app written in .NET MAUI to view this data. These will be a series of articles on how to do all that with Raspberry Pi 4 and .NET 6.
In this part, I’ll go over writing a program to take measurements of temperature, humidity, and barometric pressure using Raspberry Pi. Let’s get started!
Goals
- Connect temperature, humidity, and barometric pressure sensors to Raspberry Pi.
- Read data from the sensors using .NET 6.
- Show data using the LCD screen.
- Run data collection program at the start of Raspberry Pi.
Components
- Raspberry Pi 4
- Barometer-BMP280 from SunFounder modules kit
- Humiture Sensor from SunFounder modules kit
- I2C LCD 1602 Module from SunFounder modules kit
- Breadboard to connect the diode to Pi. (SunFounder modules kit includes both the BreadboardBB and a GPIO Breakout Expansion Board to connect to Pi. GPIO board is optional and can be replaced by jumper wires).
- Jumper wires
Connecting Sensors
In the previous part, we connected a diode to a GPIO pin. GPIO stands for “General-purpose Input/Output” and does not have a specific purpose, that is, it can be used for any device. In the example with the diode, a GPIO pin was used to control a diode by changing the pin voltage from HIGH (diode on) to LOW (diode off). It is simple with a diode but can become increasingly difficult to manage if data needs to be transferred from or to the sensor. In that case, changes from HIGH to LOW must be carefully synchronized and both controller and the peripheral need to agree on timing and data rate. To not have to solve these issues every time, other connection types exist. One of such type is I2C or Inter-Integrated Circuit. I2C requires two wires SDA and SCL to work and can support multiple devices connected with the same pins. SDA is a serial data pin that transmits the data. SCL is a clock pin that transmits a clock signal from a controller for synchronization. The message in the I2C protocol contains a device address to support multiple devices on the same pins. To learn more about the I2C protocol check out this article on Sparkfun.
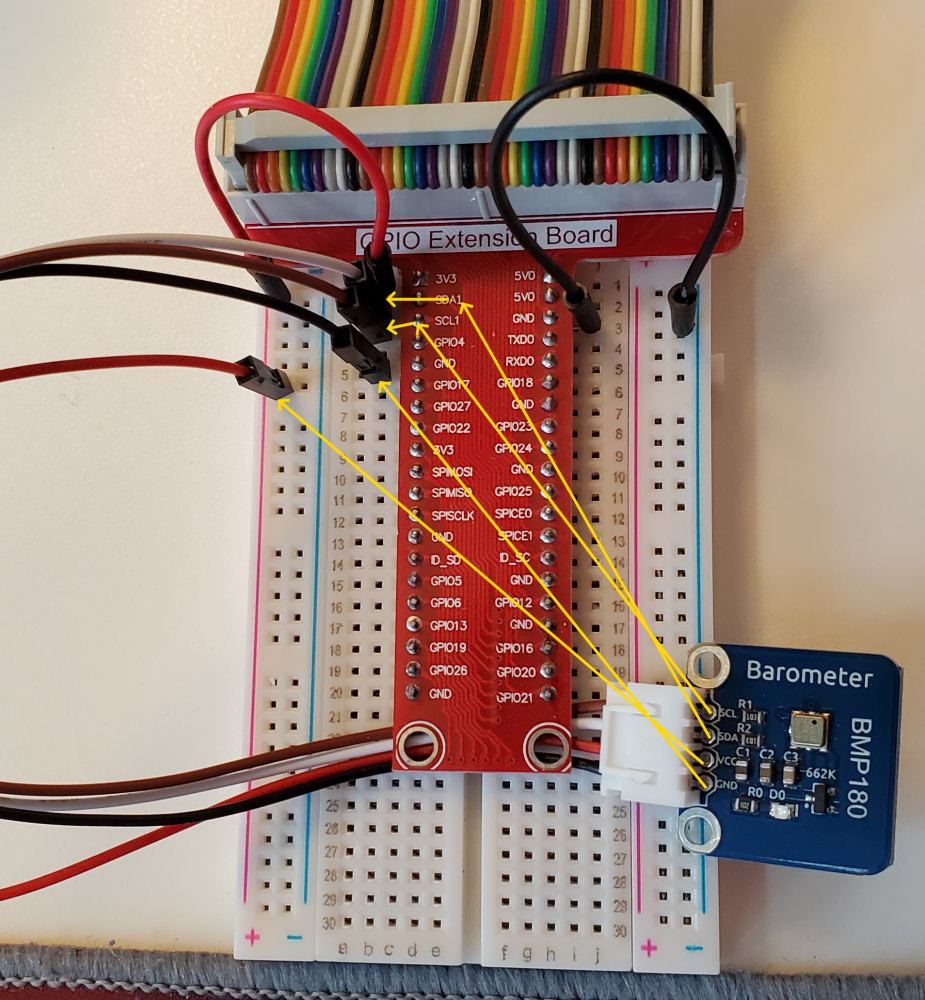
The reason I’ve talked about I2C is that Barometer-BMP280 works via I2C. It has four wires:
- SDA and SCL wires, which are connected to the corresponding pins on the Pi
- VCC and GND wires which are connected to 3V3 and GND pins respectively.
Here is how it looks with wires connected: 
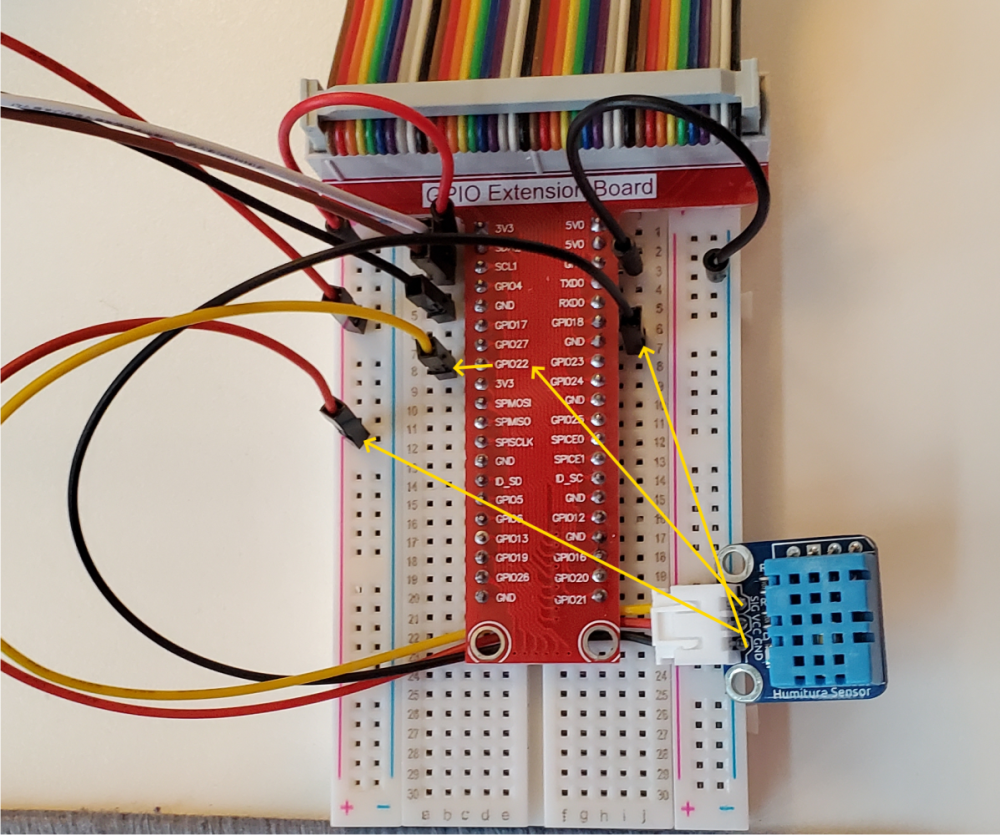
Humiture Sensor (DHT11) works via GPIO pins and is connected similarly to the diode. It has three wires:
- Signal (SIG) that goes into any GPIO port. I’ve chosen GPIO22 for it.
- VCC and GND wires go to the 3V3 and GND, respectively.
Here is how it looks with wires connected: 
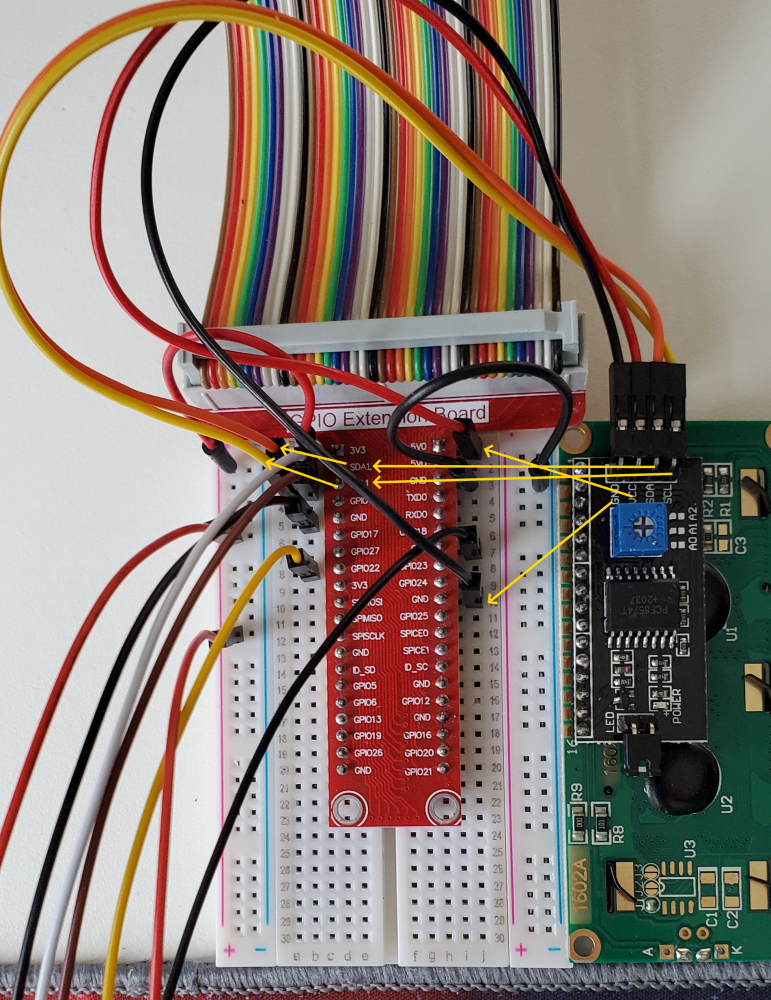
The last item, which should be connected to the board, is LCD 1602. LCD 1602 uses the I2C protocol as the barometer. As described above, I2C can support multiple devices (given that their addresses are different from one another), so LCD 1602 is connected to the same SDA and SCL pins as the Barometer-BMP280. VCC and GND wires of the LCD 1602 should be connected to 5V0 and GND, respectively. Here is how it looks when connected:

Note, that VCC for LCD needs to be connected to the 5V0 pin instead of the 3V3 as for other sensors.
Reading Values
Now, after components are connected, it is time to write a program that will collect and display data.
Let’s start by creating a new console app named WeatherStation.Collector and switch to the app’s folder.
dotnet new console -o WeatherStation.Collector
cd WeatherStation.Collector
The first step is to add references to necessary libraries. As in the diode example, add a reference to System.Device.Gpio library. System.Device.Gpio supports working the GPIO and the I2C pins, and that’s all you need to work with devices in this example. Although, it will require time and careful study of the sensor’s specifications to communicate with them via GPIO or I2C. Fortunately, Iot.Device.Bindings library already does that for us. Iot.Device.Bindings contains abstractions for a lot of popular devices available for Raspberry Pi or Arduino, including Barometer-BMP280, Humiture Sensor, and LCD 1602. So, add a reference to Iot.Device.Bindings to take advantage of those implementations. If you are curious how those are implemented, you can check out the source code, as it is open-source!. To summarize, here are the references needed:
Next, let’s read values from the humidity sensor. Iot.Device.Bindings include a Dht11 class with three properties exposed, IsLastReadSuccessful, Humidity, and Temperature. Dht11 constructor requires a pin number to which the signal wire is connected. In my example, it is connected to GPIO 22. Here is a simple loop that reads values and reports back to the console:
The above code:
- Includes necessary namespaces.
- Instantiates an instance of the
Dht11class passing a GPIO pin number to the constructor. - Starts an infinite loop and requests values from the sensor on an interval of 2 seconds.
If the read was successful, the values are reported to the console.
Run the program using dotnet run command to see its output results. The output should be similar to:
Dht11 reports temperature to be 20.8 °C with humidity 34 %RH
Dht11 reports temperature to be 20.8 °C with humidity 34 %RH
Dht11 reports temperature to be 20.8 °C with humidity 35 %RH
Dht11 reports temperature to be 20.8 °C with humidity 35 %RH
Dht11 reports temperature to be 20.8 °C with humidity 35 %RH
Dht11 reports temperature to be 20.8 °C with humidity 36 %RH
Dht11 reports temperature to be 20.8 °C with humidity 36 %RH
Nice! The following step is Barometer-BMP280. Like the humidity sensor, there is a class in the Iot.Device.Bindings library named Bmp180 that can be used to work with this sensor. However, Bmp180 constructor expects an instance of an I2cDevice which in turn requires knowing the I2C bus ID and the device address. Bus ID for Raspberry Pi is given, it is 1, but getting a device address requires running i2cdetect command from i2c-tools. To do that, first install i2c-tools by running sudo apt-get install -y i2c-tools and then run i2cdetect -y 1. Here, -y flag disables interactive mode and 1 is the ID of the I2C bus. The result should look like the following table:
     0  1  2  3  4  5  6  7  8  9  a  b  c  d  e  f
00:          -- -- -- -- -- -- -- -- -- -- -- -- --
10: -- -- -- -- -- -- -- -- -- -- -- -- -- -- -- --
20: -- -- -- -- -- -- -- 27 -- -- -- -- -- -- -- --
30: -- -- -- -- -- -- -- -- -- -- -- -- -- -- -- --
40: -- -- -- -- -- -- -- -- -- -- -- -- -- -- -- --
50: -- -- -- -- -- -- -- -- -- -- -- -- -- -- -- --
60: -- -- -- -- -- -- -- -- -- -- -- -- -- -- -- --
70: -- -- -- -- -- -- -- 77
There are two values in the table, that means there are two devices: one on address 0x27 and another is on address 0x77. I know that 0x27 is LCD and 0x77 is the barometer. The way I figure that out is by un-plunging LCD and running the query again. Be sure to check for proper addresses on your device.
With this info, Bmp180 class can be instantiated like like this using Bmp180 barometer = new Bmp180(I2cDevice.Create(new I2cConnectionSettings(1, 0x77)));. Values of pressure and temperature can be read via ReadPressure and ReadTemperature methods.
Here is how the code looks like:
Notice a few new namespaces that I added: one to work with I2C devices and another is specifically for the Bmp180 class.
Bmp180 class exposes the SetSampling method to control the sampling mode. In this example, I’ve set sampling to the maximum possible resolution since power consumption is not an issue. If I had a power consumption constraint, like running on a battery, I would either leave it at default (which is “Standard”) or switch to the UltraLowPower mode. Additionally, Bmp180 does not require checking if the last read was successful, so it can be outside of the if condition.
When ran with dotnet run, the output should look like:
Bmp180 reports temperature to be 20.63 °C with pressure 98,208 Pa
Dht11 reports temperature to be 21.8 °C with humidity 33 %RH
Bmp180 reports temperature to be 20.63 °C with pressure 98,203 Pa
Dht11 reports temperature to be 21.8 °C with humidity 33 %RH
Bmp180 reports temperature to be 20.63 °C with pressure 98,201 Pa
Dht11 reports temperature to be 21.8 °C with humidity 33 %RH
Bmp180 reports temperature to be 20.63 °C with pressure 98,198 Pa
Bmp180 reports temperature to be 20.63 °C with pressure 98,195 Pa
In some cases, there are two sequential reports from Bmp180 and none from Dht11. This is because Dht11 has an unsuccessful read, and the report was skipped. Also, the temperature reading is different between sensors due to an accuracy range. DHT11 declares its accuracy to be within +/- 2.0C for temperature and +/- 5% for humidity. Bmp180 declares that accuracy for temperature is within +/- 1.0C and +/- 0.75 mmHg for air pressure.
Displaying Results
Having results in the console is good but having them on a screen is even better! As with the barometer and humidity sensors, there is a class for LCD 1602 named, wait for it, Lcd1602. Creating an instance of Lcd1602 requires an instance of the LcdInterface class that in turn requires an instance of I2cDevice similar to the instantiation of the barometric sensor. Here is the code for it:
The 0x27 address is passed to the I2cConnectionSettings constructor. This is the address of the LCD device, as was determined earlier, from running the i2cdetect command. The false flag is to indicate that the display does not accept 8-bit commands and 4-bit commands should be used instead.
LCD 1602 can hold 16 characters in each of the two rows it has, giving a total of 32 characters to be shown at any single time on the screen. There is a Clear method to clear the screen of any content, SetCursorPosition method to move the cursor between rows and columns, and the Write method to show symbols on the screen. Adding all up, the code looks like this:
Besides the usual adding of namespaces and instantiating the Lcd1602 class, note that a few of the LCD properties were pre-configured before the beginning of the loop:
UnderlineCursorVisibleis set tofalseto hide the cursor.DisplayOnis set totrueto turn on the display.BacklightOnis set totrueto have a backlight for the display.
At the beginning of each loop cycle, the display content is cleared. To display values from Dht11, the cursor is set to the first column of the first row (0, 0). To display values from Bmp180, the cursor is moved to the first column of a second row (0, 1). Finally, using the properties like MillimetersOfMercury to get air pressure and DegreesCelsius to get the temperature in Celsius, sensor data is formatted and shown on the LCD.

Running on Boot of Raspberry Pi
There are multiple ways to run the app on the boot of the Linux OS. I’ll use the systemd service to do that. I think it is the most correct and the most elegant way to achieve this. Another way, for example, can be adding a record in an rc.local script. As I’m a Windows user, I think of “systemd” as an analog of “Services” in Windows where you can create a service and configure it to run on start-up automatically. The system will manage the rest. systemd setup works similarly.
Of course, to run a service, the service has to exist in the first place. Publish the app to get the native executable by running dotnet publish -r linux-arm -c Release. The published app should be located in /home/pi/WeatherStation.Collector/bin/Release/net6.0/linux-arm/publish folder.
To define the service for systemd to run, create a service unit definition file under /lib/systemd/system/weather-collector.service. Since this is a system folder, you’d need an editor running under the elevated privileges to save the file. I do it by using nano. Here is the full command sudo nano /lib/systemd/system/weather-collector.service. The content of this file should be like this:
Save the file and exit the editor. Run the following commands to enable the newly created service.
sudo systemctl daemon-reload
sudo systemctl enable weather-collector.service
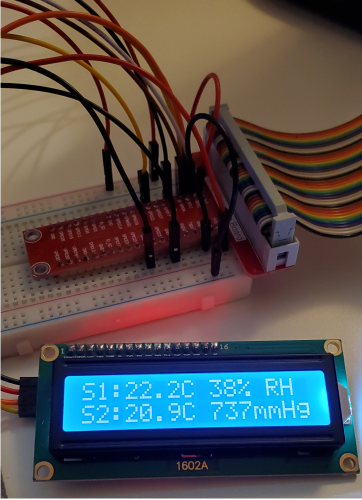
Reboot the Pi and the service should run automatically. The LCD screen should start showing current stats.
To check if service is running under sytemd, run systemctl list-units --type=service | grep weather command that should output a record like this:
weather-collector.service loaded active running Weather data collection app
Note that it mentions that service is active and running.
Earlier, I stated that using systemd is more elegant than other approaches. This is because it gives fine-grain control over the service lifecycle. For instance, if you need to stop the service to run your local app while making changes, you can run sudo systemctl stop weather-collector.service. This command will stop the service. Subsequently, running sudo systemctl start weather-collector.service will start the service again.
Conclusions
In this part, we connected temperature, humidity, and air pressure sensors. After that, we wrote the code to read data from those sensors and showed it on an LCD display. Finally, we learned about I2C protocol and how it can be used from .NET, and created a systemd service to run the app when Pi boots up.
In the next part, I’ll write about sending the sensor data to the Azure, using Azure Functions, and storing sensors data in the Cosmos DB.
See you there, and happy coding!