Part 1. Building Home Weather Station with .NET 6 and Raspberry Pi 4. The Setup
I was looking for a fun project to do this holiday season and thought that it’s about time to put my Raspberry Pi to good use. I’ve decided to build a device that will measure temperature, humidity, and barometric pressure in an apartment. Then, send this data to Azure and have an app written in .NET MAUI to view this data. I’ll split this in the series of articles on how to do it with .NET 6 and Raspberry Pi 4. In this part, I’ll describe the setup of Raspberry Pi for .NET 6 development and write a basic “Hello World” app. Let’s get started!
Goals
- Setup Raspberry Pi to work from VS Code on Windows.
- Install .NET 6 on Raspberry Pi.
- Write an app that will control a simple diode.
Components
- Raspberry Pi 4 with Raspbian OS installed and ready to be used. See “Installing the Operating System” for details. Version 3 will also work as the GPIO pins are compatible between 4 and 3.
- LED diode with pins to connect to the Pi. I’m using Dual-color LED module from SunFounder modules kit.
- Breadboard to connect the diode to Pi. SunFounder modules kit includes both the BreadboardBB and a GPIO Breakout Expansion Board to connect to Pi. GPIO board is optional and can be replaced by jumper wires.
- Jumper wires.
Connect Remotely to Raspberry Pi From VS Code
Visual Studio Code is a great lightweight editor that has a plugin for pretty much anything, and it has an integrated terminal that can be used to communicate with Pi. There are a few prerequisites for VS Code to remotely connect to Pi.
First, enable SSH on Pi. For that, log in to the Pi directly and go to “Preferences -> Pi Configuration” in the main menu. Switch to “Interfaces” section and make sure that SSH is enabled. For detailed instructions refer to “Setting up an SSH Server”
Second, install Remote SSH extension for VS Code that enables remote development. When installed, a remote connection can be established using Pi’s IP address. For detailed instructions see the “Getting Started” section of Remote SSH.
Make sure that everything works as expected by opening a Linux terminal in VS Code instance that is remotely connected to Pi and issuing a whoami command. It should output pi.
Install .NET 6 on Pi
To compile and run .NET apps on the Raspberry Pi a .NET SDK has to be installed, as it contains all the tools necessary to write an app. Since Raspberry Pi CPU architecture is ARM, a version of SDK has to be compatible with ARM architecture. Fortunately, the official .NET SDK download page lists ARM32 and ARM64 versions of SDK available. I’m using a 32-bit version of the Raspbian OS, so I’d need to install a 32-bit version of SDK. Choose the appropriate version based on your OS.
SDK is shipped as the TAR package compressed in a GZip archive (tar.gz). It needs to be downloaded, extracted into a folder, and added to the PATH environment variable. Let’s go through each step.
First, open a terminal with a remote SSH connection to the Pi and issue a wget command to download the SDK package.
wget https://download.visualstudio.microsoft.com/download/pr/72888385-910d-4ef3-bae2-c08c28e42af0/59be90572fdcc10766f1baf5ac39529a/dotnet-sdk-6.0.101-linux-arm.tar.gz -P $HOME
Parameter -P $HOME indicates that the file will be downloaded into the user’s home directory, which is typically /home/pi/ for Raspberry Pi.
Second, extract the file using a combination of mkdir and tar commands.
mkdir -p $HOME/dotnet && tar zxf dotnet-sdk-6.0.101-linux-arm.tar.gz -C $HOME/dotnet
The above commands create a folder named dotnet in the user home directory and extract the SDK archive into that folder. To verify that SDK is extracted, navigate into that folder using cd $HOME/dotnet and run the ls command to list the content of the folder. It should be similar to: 
Third, make .NET SDK available on the Bash. Add the following lines to the end of the ~/.bashrc file.
export DOTNET_ROOT=$HOME/dotnet
export PATH=$PATH:$HOME/dotnet
Open ~/.bashrc file from the terminal via nano ~/.bashrc or from VS Code directly (my preferred option) by using “File” -> “Open File” menu and navigating to the user home folder. Save the file and restart the Pi by issuing sudo reboot command.
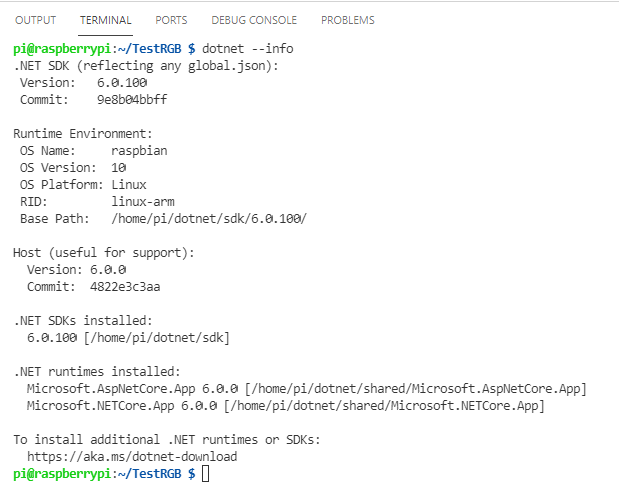
After reboot, verify that dotnet SDK is properly installed and available on the terminal by running dotnet --info command. It should output something similar to:

That is it, now all is ready to write and run .NET apps on the Pi just as on any other platform.
Setting Up the Breadboard
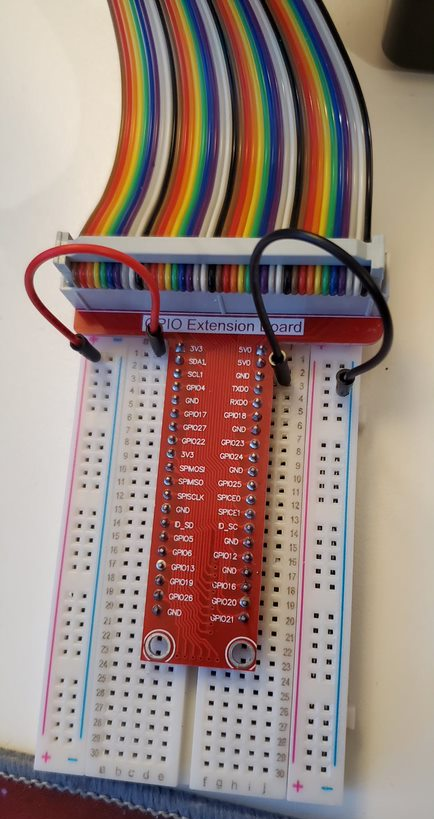
For the diode to work, it needs to be connected to the Pi. There are multiple ways to do this. In the following example I’ll be using a breadboard. Insert the GPIO Breakout Expansion Board into the breadboard and connect it to the Pi via a ribbon cable. The result looks like the following:

Next, connect power and ground (GND) to the breadboard. On the breadboard, the powerline is marked as + (pink-ish line) and the ground is marked as - (blue-ish line). Connect them by using two short male-to-male jumper wires. I’ll use red wire for the powerline and black wire for GND. The red wire goes into the 3V3 port, and GND goes into the GND port.

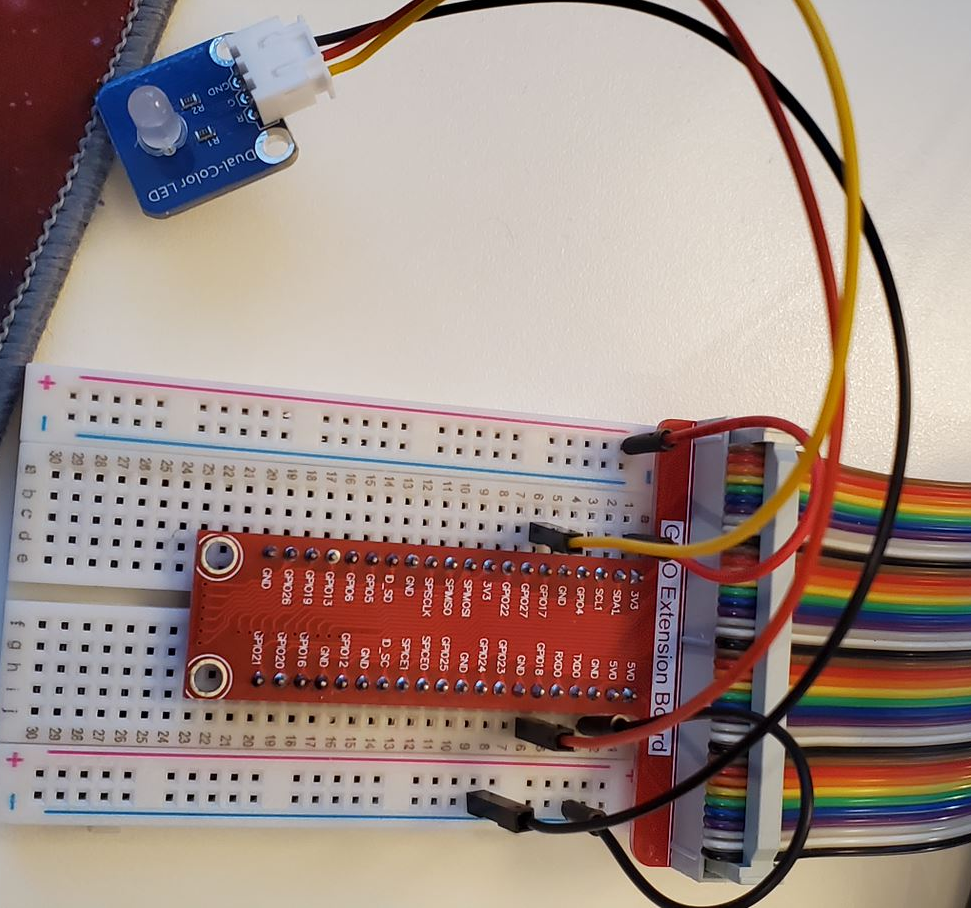
Now, the diode from the SunFounder kit has 3 wires coming out of it: one for red color (marked R), one for green color (marked G), and the ground (marked GND). R and G wires will go into GPIO 17 and 18 respectively, GND will go to the ground line on the board. Here is how it looks when connected:

Note: GPIO pins 17 and 18 are chosen randomly, so you can use any GPIO pins to connect the diode.
The breadboard setup is complete. Time to write some code.
“Hello World” from .NET on Raspberry Pi
Let’s create a simple console app that will make a diode blink “Hello World” in morse code. This is purely for demonstration purposes to see that our setup works. Part 2 will demonstrate a real app to collect temperature, pressure, and humidity.
Create an app named HelloPi using the console template by issuing the following command in the terminal.
dotnet new console -o HelloPi
cd HelloPi
Let’s see if it runs by executing dotnet run in the ~/HelloPi folder. “Hello, World!” should be printed in the console.
Let There Be Light
Since VS Code is already connected remotely to Pi, open newly created project by going to “File” -> “Open Folder”. Then open the HelloPi folder. The LED is connected to GPIO pins, so System.Device.Gpio library should be used to work with GPIO pins from .NET. Add the following item group to the csproj file to include the System.Device.Gpio library to the project.
System.Device.Gpio exposes an API called GpioController that allows working with GPIO pins. Here is a sample of how to open a GPIO pin and write a signal to it.
The code above includes the GPIO namespace, instantiates an instance of the GpioController, opens a green pin 18 for a write operation, writes a high value to it to make the diode glow, waits for 500ms, and writes a low signal to turn off the diode. Finally, the pin is closed and the program exits.
Morse Code “Hello World”
To make it more fun then just blink a diode on a timer, let’s encode “Hello World” into diode blinking.
The rules for Morse Code are as follows:
- The length of a dot is 1 time unit.
- A dash is 3 time units.
- The space between symbols (dots and dashes) of the same letter is 1 time unit.
- The space between letters is 3 time units.
- The space between words is 7 time units.
The full alphabet of the international Morse Code can be found on Wikipedia. The Hello World in the Morse Code is represented as .... . .-.. .-.. ---/.-- --- .-. .-.. -.., where / signifies the end of the word. For our diode example it means we need to define a unit time and switch the diode on/off based on the rules above.
When put together, the final code looks like this:
Conclusions
In this part, Raspberry Pi was set up to work with VS Code remotely. .NET 6 SDK was installed on the Raspberry Pi and made visible from the bash terminal. Also, a small silly program was written to transmit “Hello World” in morse code using GPIO pins and the LED. This demo program made it clear that there is an easy way to work with Raspberry Pi GPIO pins from .NET.
In part 2, the diode will be replaced with the actual sensors to measure temperature, humidity, and pressure. In addition, I’ll show how to work with I2C devices using .NET on Raspberry Pi.
See you there, and happy coding!