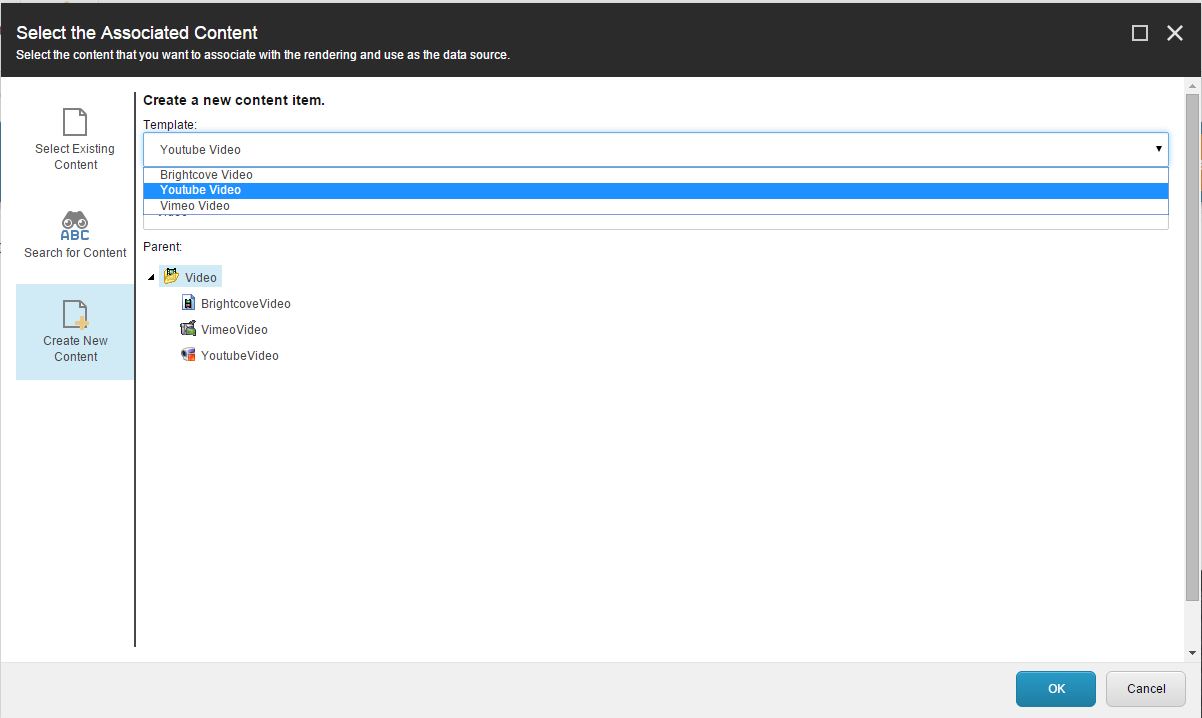
Multiple datasource templates for Associated Content dialog
Generally it’s a good idea to specify a “Datasource template” for sitecore rendering. It gives your users a great benefit of creating datasource items right from the “Associate content” dialog and also it will allow them to select items of this template only. This works just fine, until you get to a point when your rendering has to accept items of different types (templates) or even better, you want to be able to create items of different types right from the “Associated content” dialog.
Multiple templates for selection
Sitecore does not support multiple datasource templates out of the box, there is a blog post by Gert Gullentops, that helps you fix this. Basically all you need to do is provide your custom pipeline that will parse a list of templates separated by some special character, pipe simbol (|) for example.
public class GetMultipleDataSourceTemplates
{
    public void Process(GetRenderingDatasourceArgs args)
    {
        Assert.ArgumentNotNull(args, "args");
        if (args.Prototype != null)
            return;

        var data = args.RenderingItem["Datasource Template"];
        if (string.IsNullOrEmpty(data))
            return;
        var templates = data.Split(new[] {'|'}, StringSplitOptions.RemoveEmptyEntries);
        foreach (var name in templates)
        {
            var item = args.ContentDatabase.GetItem(name);
            if (item == null)
                continue;
            var template = TemplateManager.GetTemplate(item.ID, args.ContentDatabase);
            if (template != null)
                args.TemplatesForSelection.Add(template);

            args.Prototype = item;
         }
    }
}
and of cource make sitecore aware of your plan to process datasource templates:
<configuration xmlns:patch="http://www.sitecore.net/xmlconfig/">
  <sitecore>
    <pipelines>
      <getrenderingdatasource>
        <processor patch:after="*[@type='Sitecore.Pipelines.GetRenderingDatasource.GetDatasourceTemplate, Sitecore.Kernel']"
                   type="YourNamespace.GetMultipleDataSourceTemplates, YourAssemblyName">
      </processor>
     </getrenderingdatasource>
    </pipelines>
  </sitecore>
</configuration>
Note: Don’t forget to set a prototype property, otherwise “Create new content” option will be disabled in “Associated content” dialog. It does not really matter what to put there as long as it is not null.
Now you can do something like this:

Okay, we solved a problem of selecting items of different templates, but right now our users has to go to “Content editor” and create those items, and that’s does not sound very convenient. Let’s see what we can do about that.
Multiple templates for “Create New Content” option
The idea here is to bring a list of templates to “Associate content” dialog from which user can select one and use it to create sitecore item. This list should come from “Datasource template” field that we “enhanced” in previous section. Let’s start! Code for this dialog is located in Sitecore.Buckets.Forms.SelectRenderingDatasourceForm class which lives in Sitecore.Buckets.dll. The only way to make it learn new tricks is to inherit this class and add new logic.
public class SelectRenderingMultiTemplateDatasourceForm : SelectRenderingDatasourceForm
{
}
Now we can get our list of templates. In previous section we set “Templates For Selection” property in our pipeline, now we will use this to get a list of available templates.
protected Combobox AvaliableTemplates;

protected override void OnLoad(EventArgs e)
{
    base.OnLoad(e);
    var templateIds = IncludeTemplateForSelection.Split(new[] {','}, StringSplitOptions.RemoveEmptyEntries).Distinct();
    using (var switcher = new DatabaseSwitcher(Database.GetDatabase("master")))
    {
        foreach (var tId in templateIds)
        {
            var t = Context.Database.GetItem(tId);
            if (t == null)
                continue;
            AvaliableTemplates.Controls.Add(new ListItem
            {
                ID = Control.GetUniqueID("ListItem"),
                Header = t.DisplayName,
                Name = t.DisplayName,
                Value = tId
            });
        }

    }
}
Note: Sitecore will include prototype template in the list, so we need “Distinct” operation to ensure uniqueness in our list.
Next step is actually create a new item in sitecore using selected template. Inside SelectRenderingDatasourceForm there is a method called CreateDatasource, but unfortunately this method is declared as private and cannot be overridden. That’s why we need to bring a few extras lines of code with us. Code is quite simple, it consists of the following steps:
- Check that we are in “Create” mode.
- Make sure that parent item is selected.
- Validate new item name
- Get localized item if exists.
- Create new item using the right overload (Branch or a Template)
protected override void OnOK(object sender, EventArgs args)
{
    Assert.ArgumentNotNull(sender, "sender");
    Assert.ArgumentNotNull(args, "args");
    if (CurrentMode.Equals("Create", StringComparison.OrdinalIgnoreCase))
    {
        CreateDatasource();
    }
    else
    {
        base.OnOK(sender, args);
    }
}

private void CreateDatasource()
{
    var obj = this.CreateDestination.GetSelectionItem();
    if (obj == null)
    {
        SheerResponse.Alert("Select an item first.");
    }
    else
    {
        var templateId = AvaliableTemplates.Value;
        var name = NewDatasourceName.Value;
        var validationErrorMessage;
        if (!this.ValidateNewItemName(name, out validationErrorMessage))
        {
            SheerResponse.Alert(validationErrorMessage);
        }
        else
        {
            var contentLanguage = (ServerProperties["cont_language"] as Language);
            if (contentLanguage != null && contentLanguage != obj.Language)
                obj = obj.Database.GetItem(obj.ID, contentLanguage) ?? obj;

            using (var switcher = new DatabaseSwitcher(Database.GetDatabase("master")))
            {
                var t = Context.Database.GetItem(templateId);

                var selectedItem = !(t.TemplateID == TemplateIDs.BranchTemplate)
                ? obj.Add(name, (TemplateItem) t)
                : obj.Add(name, (BranchItem) t);
                if (selectedItem != null)
                    this.SetDialogResult(selectedItem);
            }
            SheerResponse.CloseWindow();
        }
    }
}
Now when we have all our backend logic, let’s switch to the UI part. UI for “Associate content” dialog is located in \Your Webroot\sitecore\shell\Applications\Dialogs\SelectRenderingDatasource\SelectRenderingDatasource.xml. Copy this file to \shell\Override\SelectRenderingDatasource.xml in your local project. Sitecore will detect an override automatically and use it instead of the original dialog. There are only two things that we need to change in \shell\Override\SelectRenderingDatasource.xml
-
Set a new codebeside class:
<codebeside type="YourNamespace.SelectRenderingMultiTemplateDatasourceForm, YourAssemblyName" /> -
Replace
<!--Create Section-->content with new markup:<!--Create Section--> <Border ID="CreateSection" Height="100%" Visible="false"> <div> <div> <Literal Text="Template:"/> <Combobox ID="AvaliableTemplates"></Combobox> </div> <br/> <div> <Literal Text="Name:"/> <Edit ID="NewDatasourceName" OnChange="javascript:nameChanged(this,event)" Class="edit"></Edit> </div> </div> <Literal class="scFieldLabel" Text="Parent:"/> <Scrollbox style="height: calc(100% - 80px);"> <MultiRootTreeview ID="CreateDestination" DataContext="CreateParentDataContext" Click="CreateDestination_Change" ShowRoot="true"/> </Scrollbox> </Border>
That’s it, publish your project from Visual Studio and you should see “Associates content” dialog with new “Template” option.
